Zendure Social Media Posting Guide

https://www.zendure.com

General Guidelines

Time

  • Posts in the afternoon usually do best. Evening is also strong. 
  • Evening weekend posts do the best usually. 

Hashtags

Recently used:

#zendure #travelessentials #poweronthego #adventureon #travelawesome #powerbank #iphone #android #ipad #phonecharger #charger #smartphone #nintendoswitch #ontheroad #technology #travel #tech #portablecharger #work #business #pleasure #style #love #luxury #instatravel #travelgram #styleblogger #travelblogger #adventure #techblogger

Please see recent posts for more recently used. 

Slogan

Get charged. Get going. 

Style / Themes

Travel oriented. 

Travel / Outdoors / Active Lifestyle / Professional 

Style not consistent currently. Please move forward with unified style. 
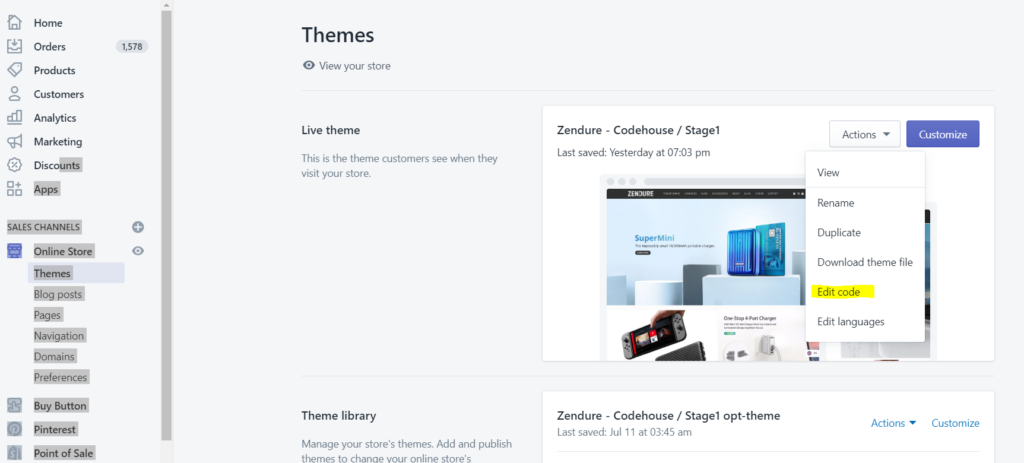

Hootsuite

Used for social media posting, scheduling, managing and reporting. 

Facebook 

Image Dimensions | File Sizes

  • Cover image: 820 x 312 (minimum 400 x 150)
  • Profile image: ≥180 x 180
  • Shared post image: 1200 x 630
  • Shared link preview image: 1200 x 628
  • Event image: 1920 x 1080

Twitter

Image Dimensions | File Sizes

  • Header image: 1500 x 500 | maximum 5 MB
  • Profile image: 400 x 400 | maximum 2 MB
  • In-stream image: 440 x 220

Instagram 

Image Dimensions | File Sizes

  • Profile image: 110 x 110
  • Image thumbnail: 161 x 161
  • Shared photos: 1080 x 1080
  • Shared videos: 1080 pixels wide
  • Instagram Stories: 1080 x 1920 (minimum 600 x 1067) | maximum 4 GB

Pinterest 

Image Dimensions | File Sizes

  • Profile image: 165 x 165 | maximum 10 MB
  • Board cover image: 222 x 150 (minimum 55 x 55)
  • Pinned image preview: 236 pixels wide

YouTube

youtube.com/c/Zendure

Image Dimensions | File Sizes

  • Channel cover images: 2560 x 1440 | maximum 4 MB
  • Channel icon: 800 x 800
  • Video thumbnail: 1280 x 720

LinkedIn

https://www.linkedin.com/company/zendure

Image Dimensions | File Sizes

  • Banner image: 1584 x 396 | maximum 4 MB
  • Profile image: 400 x 400 (minumum 200 x 200) | maximum 10 MB
  • Company Cover image: 1536 x 768
  • Shared image: 350 pixels wide
  • Shared link preview: 180 x 110
  • Company logo image: 300 x 300 | maximum 4 MB
  • Company cover image: 1536 x 768 (minimum 1192 x 220) | maximum 4 MB
  • Company page banner image: 646 x 220 | maximum 2 MB
  • Square logo (appears in company searches): 60 x 60 | maximum 2 MB

Product Metafield Data (Shopify): Adding Spec displays, Different color/size options, Pop up display, Pre-Order buy button

How to add to the spec section of Shopify:

  1. Click ‘More Actions’ at the top of page.
  2. Click ‘MetaField2 App- Products’. This will open a new tab where all the product metafield data lives
  3. Find a product of the same type already on Shopify and see what is listed and what fields are used. Replicate with the correct specs for the new product.
    (Items like capacity, dimensions, color, warranty, input, output, etc.)
  4. Save Values.

How to add different color or size links to the product page:

  1. Save the image you want displayed for the different color option in 80x80px size.
  2. Click ‘Online Store’ in Shopify.
  3. Under the live there, click ‘Actions’, click ‘Edit code’ (See image below for reference)
  4. Scroll down to Assets folder and click. Click ‘Add a new asset’.
  5. Upload all images you want to use for color options.
  6. Then go to the product page you want to add this color option display to.
  7. Click ‘More Actions’ at the top of page.
  8. Click ‘MetaField2 App- Products’. This will open a new tab where all the product metafield data lives
  9. Scroll down to ‘ Field: local.swatch-color ‘ or ‘ Field: local.swatch-size’
  10. Add the data.
    The format is, without any spaces:
    Color|image-file-name|link; Color|image-file-name|link;etc.
    Example:
    Silver|swatch-A3PD-s.jpg|A3PD-s;Black|swatch-A3PD-b.jpg|A3PD-b;Red|swatch-A3PD-r.jpg|A3PD-red
  11. Save Values.

How to Turn off the Newsletter Pop Up OR Make a product page a pre-order buy button:

  1. Click ‘More Actions’ at the top of page.
  2. Click ‘MetaField2 App- Products’. This will open a new tab where all the product metafield data lives
  3. Put a ‘y’ in the field ‘set to “y” to disable the newsletter popup’
    OR ‘Pre-order only? “y” for yes, blank for no’
  4. Save Values.

Blog Update Guide

OBJECTIVE Decrease bounce rate on blog. Push readers down funnel to product pages. Increase page value of top blog pages.
TO DO:
1Edit blog post for readbility and grammar. (Some old ones are pretty bad – don’t spend a huge amount of time rewriting though.)
2Update links and add keyword friendly Link Titles. Please update links to top selling / new products. Add links if there aren’t any. Make sure anchor text still makes sense with links and update section to reflect new product if necessary
3Add buttons to blogs (1-2 Max.) Bottom of page for sure, add one in middle if appropriate – like to collection page or product page
4Add keyword-friendly alt text to photos & update photos if necessary or if we have better photos to match now
5Update meta description (SEO — keywords!)
6Change author to Zendure Team if under Bryan
SEO:
In meta, alt text, link titles, blog content, etc. Please keep keywords for page in mind
Use ‘portable charger’, ‘power bank’, ‘wireless charger’, ‘external battery’, etc. when using keyword in meta, alt, titles. Not product name
Relate to what the blog post is about for another keyword —
EX: small portable charge on a flight / power bank on flight /
qi wireless charging
BUTTON:
<br></br><p style=”text-align: center;”><a href=”/collections/a-series-portable-chargers” class=”shop-button”>Shop Power Banks Now</a></p>
Update link and button text

Expensify Guide

  1. Download Expensify and register with Zendrue email address
  2. Make sure that you could find ‘Zendure US’ policy in setting/Policies
  3. Under Report, use ‘+’ on the right corner to create new reports
  4. In your report, you could upload serval receipts by take pictures which you need to reimbursement.
    1. Please add the amount, note, title manually, if these information didn’t catch by the app automatically.
    2. You can use ‘add expense’ button to upload several receipts
  1. Submit the report to [email protected] and cc [email protected] so that Enya could approve your reimbursement.
  2. After approval, you will receive reimbursement shortly. 

– You can use either PayPal or your personal bank account as your deposit account for reimbursement. Check the link below for detail instructions:https://docs.expensify.com/setup-for-submitters/advanced-configuration-for-submitters/add-a-deposit-account-united-states

– If you drive out for company, such as photo shooting, you can add the distance for your expense.https://docs.expensify.com/setup-for-admins-and-accountants/using-your-policies/mileage-and-gps-expenses

Update on Sep 26th

=> Click More option when you submit an expense receipt.

=> Click ‘Categories’

=> Choose categories according to the receipt you submitted. Here are some examples for your reference.

– Airplane tickets, Uber, Gas, etc <>  Sales/Branding Marking Center-Traffic
– Any meals eligible for reimbursement including all-hands meeting and meal during a business trip,  <> Sales/Branding Marketing Center-Meals
– Hotel for business trip <> Sales/Branding Marketing Center-Hotel
– Office supplies, such as name cards, shipping label, pens etc <> Functional Center-Office equipment
– Social media promotion fee <> Branding Marketing center-Social Media

image.png
image.png
e3c3dc0ec934424efa459fb8cd071e2.jpg

How to Post a Blog Guide

  1. Log into shopify
  2. Under sales channels click ‘Online Store’ and navigate to ‘Blog Post’
  3. Hit ‘Add Blog Post’ button
  4. Insert your keyword-rich title
  5. Add the article content in the ‘content’ block
    • Make sure all your links are present (2-5 per blog post)
    • If you need to add links, click the chain-link button (‘Insert Link’).
    • Add your URL to the ‘Link to’ field
    • Add an SEO-friendly ‘Link Title’ (otherwise known as Alt-Text)
  6. Add pictures between paragraphs where it is most natural and makes sense
    • Insert an image that you either upload, choose from a product page or choose from a image URL.
    • Before you insert the image enter the alt text (no more than 5 to 6 words to describe the image, using keywords) and choose what size you would like the image to be.
    • After you insert image click on it to highlight it press the image button to edit the image and center the image under alignment. Here you can also edit the image size in all text if needed.
  7. Go through your content and highlight each header, click the formatting button and make either ‘heading one’ or ‘heading two’ size
  8. Edit the URL if your title is too long for the URL or you want to modify it
  9. Under ‘Organization’ Change the ‘Author’ to ‘Zendure Team’. Leave ‘Blog’ as the News category.
  10. Under tags and put the best fitting tag: ‘How-To’, ‘Reviews’, ‘E-Best’, ‘News’
  11. Add CTA (call to action) buttons.
    Add at least one at the end, and throughout post if applicable.
    Go to blog post code (<> is the Show HTML button) and enter code where you want the button:

    <br></br><p style=”text-align: center;”><a href=”/collections/a-series-portable-chargers” class=”shop-button”>Shop Power Banks Now</a></p>

    Update link and button text.
  12. Update meta description (SEO — keywords!)
  13. Change the visibility to visible or select a specific publish date if you want to publish at a future time
  14. Hit save and review your live blog post to make sure everything looks good

ADDITIONAL INFORMATION ON ALT TEXT, FILE NAME CONVENTIONS AND IMAGE OPTIMIZATION
How to write good alt text: https://moz.com/learn/seo/alt-text
Along with optimization of files names, this is great for SEO!

Please review this article for good filenaming practices: https://saradoesseo.com/seo-basics/what-should-i-name-images-for-seo/
Full article on Image optimizationhttps://yoast.com/image-seo/

File Naming Style

  • The filename should preferably be short and descriptive.
  • It is always good to use same keywords in a filename as well as in page title.
  • Do not use filenames such as service.htm or job.htm as they are generic. Use actual service name in your file name such as computer-repairing.htm.
  • Do not use more than 3-4 words in file names.
  • Separate the keywords with hyphens rather than underscores.

Private: Tom – Weekly Update – 04/15/2019

Last Week

  • Passport PD: Crowdfunding video treatment, teaser trailer script
  • A3PD Sizzle Reel Video
  • SuperTank: Last of surveys, update published
  • Website: SuperPort and SuperTank, progress on website adjustments
  • Brand Video: PSA script written
  • Misc: Reviewed ad copy, revised PRSA description and design awards entry
  • G Suite final setup guide

This Week

  • SuperTank: BackersHub? Prepare survey for IGG, post update re: Blue
  • Passport PD: Crowdfunding video plan, shooting plan for trailer (shoot by next week)
  • A6PD Sizzle Reel (need glamor shots)
  • Website: Support consultant on the rest of the website adjustments
  • Guinness: brainstorming and planning
  • Brand Video: schedule shooting (PSA)
  • Pinterest news post (and press release?)
  • Misc: Payoneer, recurring payments, Pinterest feed follow-up, Lyft?

Log in Error

If you can not find the login button on home page, go to kb.zendure.com/wp-login.php to log in with your zendure account. You will see all the post.

If you fail to login and see ‘Registration is disabled for this website. Please contact the administrator for any queries. Go to Home Page’ on your screen, just email ‘[email protected]’ for the issue.